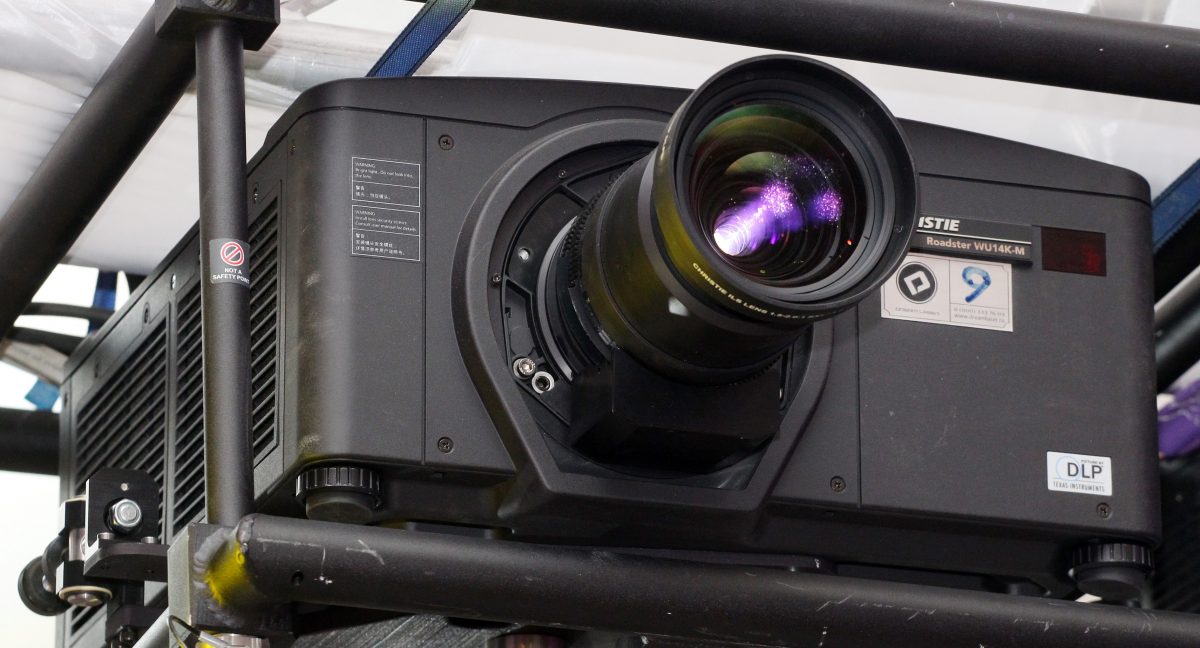
The selection of projectors can be daunting. There’s the choice of the engine used to create the images, various light source technologies, the brightness of that light source, and long, standard, short and ultra-short throw lenses. This is a brief guide to help you understand these options when you’re looking to use projection in a theatre. Continue reading “Projection in Theatre – Projectors”
TL;DR: If you are intending to use more than 2 video outputs (either HDMI or DVI) on a Mac Pro (in this case, the Late 2013 version) then in addition to using active DVI adapters (as specified in this Apple KB article) you will need to ensure that there are powered-on devices on the other end of all of those adapters. Continue reading “Notes when using multiple video outputs on a Mac Pro”
About a year ago I started investigating if it would be possible to create an immersive, engaging and realistic virtual presence experience for live theatre. The general idea would be to construct a live 3D representation of a stage, then allow a remote audience to select where they would like to see the show from. Perhaps virtual cameras could be used by a live video production team to broadcast a show with pre-defined edits, but without cameras interrupting the view or distracting the audience that is physically present in the theatre at the time. Those viewing remotely could use a Virtual Reality headset to watch the show, looking around them as they wanted, or even getting up and moving around without the risk of verbal abuse and projectiles being thrown at them. Continue reading “Virtual Theatre”
Well, the time has come to dismantle many of my projects. My parents are itching to put my old room back to use, and I need to gather as much cash as I can for an exciting excursion to the other side of the world next year. I have felt some tears forming, but I just remind myself what it is in aid of and all of the unknown projects that are yet to come.
Not long before Christmas, as part of a new AV system, I installed an Acer Aspire Revo as a frontend for my now well established MythTV setup. This works great, but it did set me back a fair amount.
The SqueezeBox series of devices from Logitech has got to be one of the best media streamer ranges out there. Not long after I moved into my flat I bought a SqueezeBox Boom and it is awesome. Fantastic audio quality with an almost impossible amount of bass from a small single-unit stereo now sat next to my bed.
The downside to the SqueezeBox devices is that the quality comes at a price, one which is impossible to justify at the moment. However, it happened that the following year O2 were having a fire sale of their Joggler device. I snapped one up for the bargain amount of £50 with the intention of using it as a home automation controller.
Well, the automation dream also comes at an even less justifiable cost and so the Joggler has been sitting idle in a drawer waiting for a project to bring it back to life. Thanks to the UKHA mailing list it now has a purpose. My Joggler has been reborn as a budget SqueezePlayer having followed some really easy steps.
With it connected to my surround amp, I can now stream music from my existing SqueezeBox Server and even control it remotely with a web browser. One less bit of idle kit, one new feature, and at £100 less than it would otherwise cost.
The Joggler is a popular device for customising, and there are Ubuntu builds available for it (rather than the onboard O2 OS). If you want to play with one, they are no longer available for sale from O2, so you will need to look on eBay or similar.
Over my many years of computer enthusiasm I have collected many bits of electronic stuff. I am now flogging the things I no longer need on eBay. There are some bargains in there, so please take a look:
One day I decided to try out Windows 7 public beta. I had a spare 500 gig drive lying around, so I thought I’d put that in my main machine and disconnect the normal 2x 250gb drives which house my day-to-day Vista install.
So I hooked up the spare drive, got Windows 7 installed, played around for a little while then got bored with it.
Reverting my computer back to its normal configuration was easy. Just remove the spare drive and re-connect the old ones. So I did that, and powered back up and glanced at the side of my perforated case. ‘Funny’, I thought, ‘I don’t remember having an amber LED inside the computer… and what’s that sound? Cables hitting a fan?’. Then came the smell. ‘F^&*ck!!’
After the reflex move of yanking the power cord, I removed the side of the case and extracted one of the drives to find the scene below.
I think there may be a flaw in the design of the SATA power connector, which means that if it’s slightly dislodged then the 5v rail and ground can short out quite spectacularly. And when you have a high-power PSU, the over-current cut-out threshold is set too high so there’s no protection from things like this.
The drive which was damaged is part of a RAID 0 array, meaning that half of the data of my running system was on it. I have 2 independent methods of backup for my main computer: daily file backups of all important files (photos, source code, documents etc.) and a manual perdiodic backup using Norton Ghost. If the worst came to the worst, I should eventually be able to recover all my important stuff and theoretically a complete system image. However, last time I tried to restore from Ghost, the result was very unreliable and had to be dumped.
So, before I considered going down the route of backup restores I thought I’d have a go at repairing the drive.
It looked like only the board had become damaged, and at that only the connector and nearby soldering (the copper tracks had melted into balls) was affected. Ebay is your friend when it comes to finding rare parts, so I started there. I needed an exact match to the drive that I was trying to repair, since I needed a controller board which would work with the internal drive mechanics which should still be working fine.
The first order was a disappointment. The listing was slightly misleading, as it listed the exact model I wanted but the model I received was an equal size but completely different configuration.
The second order wasn’t as bad, but didn’t work. It was manufactured at a different plant, and used slightly different chips and a different firmware version. Although the drive spun up, none of the computers I tried it with would recognise it at all.
2nd replacement drive - didn't work
After wasting a chunk of money, I looked at the corner of my desk and whaddya know … an excact matching drive! Lesson: look around for things hiding in plain sight before wasting money. The matching drive was originally paired with the damaged one, but got replaced when it sounded like it was dying (turned out to be something else).
The identical drives which provided the solution
So, swapping the board from the twin drive to the broken one solved the problem. 2 weeks later I had a working machine again.
This morning I really struggled to get out of bed. Being very tired still, in a nice warm bed while outside it was -7 �C and my room probably wasn’t far off that, it took some convincing that I really did need to go to work. While laying there, between drifting in and out of consciousness, I got to wondering if I could make my room a little warmer without changing the central heating settings or adding another heater. I had the idea that I could set up my computers to respond to temperature.
A few months ago we were given a couple of old laptops by some relatives. I cleaned both of them up, gave one a fresh install of XP Home and the other Ubuntu. The former has now become the family PC and the latter is sitting on top of some draws in my room unused because the power supply connector is nearly unusable.
Being the lazy person I am, wanting to be able to watch TV and surf from the comfort of my bed, I decided I needed a laptop that actually works. When someone on the UKHA mailing list pointed to an offer on Amazon for an Acer Aspire One L150 (white) for �199, I decided I had to go for it. I wasn’t too keen on the white netbook though, so I paid a little more for a lovely blue number.